Friday, March 24, 2006

A Tale of Two Splashscreens

WARNING: This blog entry was imported from my old blog on blogs.sun.com (which used different blogging software), so formatting and links may not be correct.


Earlier this week, somebody got a picture of SWT creator Steve Northover "embracing" NetBeans. This promply made it into the Eclipse splash screen for nightly builds (along with a
bugreport...). Here's the splash screen:


Via
Roman I just learned that the NetBeans nightly build also has an "unusual" splash screen. Sure enough:


RCS file: /cvs/ide/branding/core/startup/src/org/netbeans/core/startup/splash_nb.gif,v
Working file: ./ide/branding/core/startup/src/org/netbeans/core/startup/splash_nb.gif
head: 1.5
branch:
locks: strict
access list:
keyword substitution: b
total revisions: 15; selected revisions: 15
description:
----------------------------
revision 1.5
date: 2006/03/23 23:37:22; author: tboudreau; state: Exp; lines: +531 -379
A fitting response to
https://bugs.eclipse.org/bugs/show_bug.cgi?id=132773
to be rolled back after the next nightly build :-)
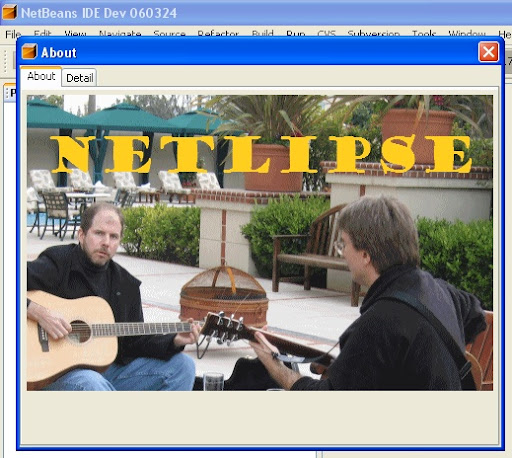


If my eyes don't deceive me, the person on the right is the same Steve Northover, this time playing guitar with NetBeans developer and evangelist Tim Boudreau.


Things are getting very friendly between the two camps.
Tim Cramer, head of tools at Sun, appeared at Eclipsecon this week and spoke on the
Matisse integration into
MyEclipse.


Competition is good for Java developers - and friendly competition is in my opinion even better.


Thursday, March 16, 2006

Creator Hotfix 3: Improved nested positioning

WARNING: This blog entry was imported from my old blog on blogs.sun.com (which used different blogging software), so formatting and links may not be correct.


A new hotfix for Creator 2 is available today. One of the fixes it contains is handling of absolute positioning inside tab panels. With this fix, you can now properly lay out your tab set panels in absolute mode, and these positions are all computed and maintained relative to the tab set position. Thus, you can move the tabset and all components properly move along.


The following screenshot shows how this works. The designer is in a special debug mode (which you can enable from the
designer DOM inspector) which shows lines and pixel distances for components relative to their viewports. Note that unlike the interactive display in
Matisse, the display is always showing the final computed left and top distances, even for components contrained to the bottom or right parent edges.


(Click for full size)


Monday, March 13, 2006

Applets in your webapps

WARNING: This blog entry was imported from my old blog on blogs.sun.com (which used different blogging software), so formatting and links may not be correct.


A question that has
come up
a number of times is how to use Applets in Creator web apps. Since we don't ship an Applet component (which renders an applet tag) out of the box, what can you do? Obviously, you can switch to the JSP view and manually enter an <applet> tag. But what if you need to provide dynamically computed parameters to the applet?


There's an extremely powerful technique you can use that I've
written it up before,
but it's useful enough that it bears repeating. And perhaps it helps to apply it to our specific scenario -- applets.


Briefly stated, the technique is to use the Output Text component to emit arbitrary HTML into the page. The Output Text can be value bound to a property in your page bean (in other words, you get a write a Java method that returns a String which is output by the output text), and you can turn off the Escape property on the Output Text to get the HTML to pass straight through, thus letting you emit HTML instead of just normal text.


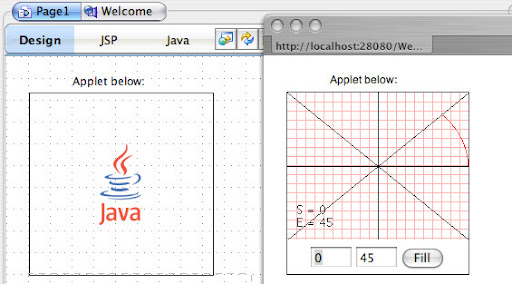
First try this: Drop an output text. Find its Escape property and turn it off. Then go edit the Text property and set it to <applet />. Hit Return. Voila! You should see the Output Text immediately replaced by a large box (300 by 150 pixels, the same as the default applet size in Mozilla) as well as a Java icon. This is how the designer shows the applet tag at designtime. It does not execute applets at designtime.


Then go and put an actual applet .class file in your web directory, and set the code= property to point to the applet, e.g. code="ArcTest.class" and width="200" and height="200", where ArcTest is the sample applet
found on java.sun.com.


If you now run, you'll see the applet successfully deployed and running. Here's a side-by-side view:


Now you just need to make the code dynamic instead. The code modeller won't always be able to evaluate the string at designtime, so you may not get the applet rendering you see above. In any case, go and change the Text property to something like #{Page1.foo} instead (where Page1 is the page you're editing). Switch to the Java file, and add something like this:


public String getFoo() {
return "<applet code=\"ArcTest.class\" width=\"300\" height=\"300\"/>";
}


P.S. You actually should put text inside the applet tag telling the user that they need to go and download the JRE for their browser. For more details on the applet tag, see for example this resource. Remember that your HTML needs to be XHTML -- lowercased and well formed.


Refactoring Reloaded!

WARNING: This blog entry was imported from my old blog on blogs.sun.com (which used different blogging software), so formatting and links may not be correct.


Jackpot is finally available.... well, as an alpha that is. But hey, I love to live on the bleeding edge - I always run with the latest and greatest bits I can get my hands on.


Here's the announcement, sent only to the NetBeans development mailing list. At this stage, the UI is not ready, but developers can start playing with the concepts and start writing refactoring scripts. Refactoring scripts, what's that you say?


Jackpot really is a new approach to refactoring. Sure, there are builtin refactorings - code transformations that are coded as direct AST manipulation. However, Jackpot also lets you write your own Rule files, using a special but obvious
rule language. Rather than describe it here, just
go check out the tutorial.


Unfortunately, there are no screenshots in the tutorial. And for any new software, the first thing I look for are screenshots. So, below follows a few screenshots to hopefully whet your appetite. It's exciting to see so many new innovations going into the NetBeans IDE!


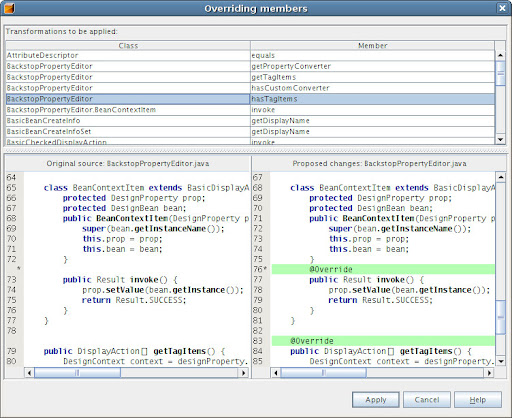
Here's the first thing I did. I applied the "Add Override Annotations" transform. This goes and looks for all methods that are currently overriding another, and adds the new JDK 5 @Override annotation to all these methods. I've recently started using this annotation in my code, but I've added them haphazardly, so it's nice to be able to do this in one shot. When you run the transformer, you get a results window with diffs before you apply the change:


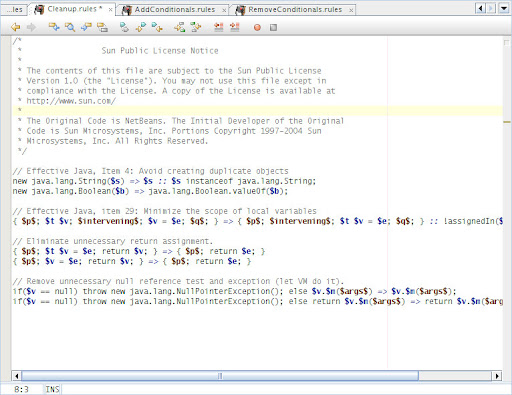
As I mentioned, you can write your own rule files too. This is the real big deal about Jackpot. It allows you to write your own, simple source substitutions - with full accuracy on types. The below shows some code cleanup rules. There are many many other rule files too, and more deprecated uses ones should be written.


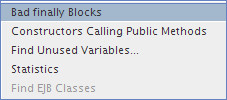
Here's the current queries menu - queries simply list results, but doesn't actually change the code:


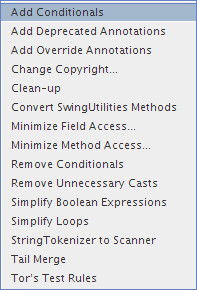
Here's the current transforms menu:


Note that it's very easy to add to these menus. Create your own rule files, open up the Command Manager and add a reference to your rule file (what, did you think "Tor's Test Rules" at the end of the menu above was part of the Jackpot distribution?). It then shows up in the menu and you can run it. Developers can then share these rule files. If you come up with some good rules, PLEASE please share them!


P.S. Remember it's an alpha so don't start complaining if you get exceptions, if the UI isn't Right(tm), etc.


Friday, March 3, 2006

Hidden Creator Feature #5: Power Inline Editing

WARNING: This blog entry was imported from my old blog on blogs.sun.com (which used different blogging software), so formatting and links may not be correct.


Creator 2 supports inline editing of lots of components. This includes "non-textual" components like buttons, text fields and text areas. There are a couple of secret flags you can set to change the behavior of inline editing.


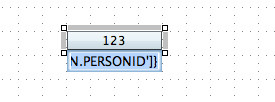
Inline editing is normally disabled for components that have are bound to value binding expressions (e.g. the value contains #{...}). Normally, at designtime, these components display "dummy data" - 123 for numeric expressions and abc for textual expressions. We can of course let you enter inline editing (by pressing F2 when the component is selected, or simply clicking on it when it's already selected, or using the context menu "Edit propertyname"). But there was a concern that people, especially novice users, would inadvertently edit their value binding expressions and get in trouble. So, it's normally disallowed. But if you run Creator with


-J-Drave.allow-vb-editing=true

(or add this to your creator.conf file), you can edit value binding expressions to your heart's content. When you enter inline editing mode, the value binding expression is shown in the designer page, and as soon as you commit, the normal dummy data is displayed again.


Inline editing also works on some components that aren't textual in the normal HTML sense - such as buttons, textfields and text areas. By default, Creator will allow inline editing of button labels by showing a textfield in place of the button when you are inline editing it. Early on I implemented inline editing of buttons with a textfield below the edited component instead. For buttons, this is still a decent behavior I think - especially when you initially drop a button, since it's a bit disconcerting to drop a button and see a text field... If you prefer that behavior, you can have it that way by running with this flag:


-J-Drave.edit-adjacent=true


Here's how this looks when you run with both flags and try to edit a value-bound button. Notice how the inline edited expression is a value binding expression, and notice how it's displayed in a textfield below the actual button:


(Text Fields and Text Areas are still inline edited in place. And note that to commit input in a text area, you press Shift+Enter since just Enter inserts a newline.)