Monday, May 30, 2005

Four Ways to Add a Component

WARNING: This blog entry was imported from my old blog on blogs.sun.com (which used different blogging software), so formatting and links may not be correct.


Sorry for the recent radio-silence on this channel. I've been sick, and my kids were too, so it's been pretty tough - especially last week. But I took some sick-days off from work and really rested and that did wonders. I'm back in business now!


Here's a little tip you might not know: there are multiple ways to get a component from the palette onto the canvas.


  • You can drag & drop it. That one should be obvious...

  • You can just click on the palette item to select it. Now move the cursor over the designer. Notice the crosshairs cursor - this
    is telling you you're about to drop a component.

    • You can click again to just drop the component at the cursor location.

    • You can drag out a rectangle. When you release, not only will the component be dropped
      at the cursor location, but it will also have its size set to match the rectangle you swiped out.


  • You can double click on the palette item. This will insert the component in the natural document flow,
    rather than using absolute positions. This is probably how you'll want to add a heading fragment or logo image, for example.


Saturday, May 21, 2005

Deceptive Art

WARNING: This blog entry was imported from my old blog on blogs.sun.com (which used different blogging software), so formatting and links may not be correct.


NetBeans logo on a T-shirt
Check out the image on the T-shirt on the right (I snagged it from
Lukas' blog).
The T-shirt is for their NetBeans 4.1 release party. Look closely at the logo - they've constructed
"4.1" using little NetBeans cubes. But look closer - the "4" is an impossible geometric construction!


I've been reading an interesting book lately:

Masters of Deception
by Al Seckel.

Well reading is the wrong term - it's really an art compilation with page upon page of reproductions
of famous "deceptive" art by artists like Escher and many I had never heard of.
I was amazed by the breadth of creativity in this area.


One really interesting image he included is a painting by Sandro Del-Prete.
This image has the property that the interpretation of the contents really
depends upon your experience (which is probably true for most pictures, but more so here).
I've reproduced only a small fragment of it - click on the small image on the left to see the real image.
Nearly all kids who see the picture see dolphins. Most adults see, well, something else...
From the book:


This image was displayed in an illusion exhibit gallery at the Museum of Science in Boston. When asked if there was any controversy about displaying this image, the curators replied that once a group of nuns had objected, but had quickly silenced when told that one's perception is based upon past experience.


Saturday, May 14, 2005

AJAX + JavaServer Faces: Better Address Entry Forms

WARNING: This blog entry was imported from my old blog on blogs.sun.com (which used different blogging software), so formatting and links may not be correct.


I

mentioned recently

that the blueprints project on java.net is posting detailed articles and
sample applications for various AJAX strategies. New entries are added
regularly.


Well, I've participated too. My first entry shows how you can add some
AJAX-style behavior to a JavaServer Faces application.


Many webforms, especially those involving
online shopping, involve address forms. When you get to fields like states,
provinces, and countries, you get these super unwieldy combo boxes or
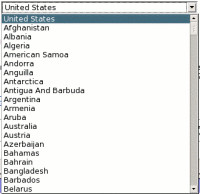
listboxes to pick an alternative from - see listbox image on the right from
Amazon.com for example. For U.S. states you're looking
at 50 alternatives, which isn't too bad, but country dropdowns usually involve
several hundreds alternatives. Hope you brought your scrolling wheel. These pages are also
slow to load since the HTML involves hundreds of <option> tags
for the listbox contents.


A dropdown is not a good user interface element if you need to choose an item
for a large number of possibilities. Take the city field. What if you wanted
to let users pick a city instead of having to type one in? Well, for the U.S. alone
the combobox would have over 25,000 entries - this is clearly not practical.


But it's an ideal situation for AJAX:


  • The server can easily store all possible cities and quickly provide
    a small number of completions upon request. Thus, each keystroke
    in the city field causes a request to provide the ten nearest city names
    for the given prefix.

  • The address form page stays small and lightweight

  • The user interface for completion is better than a dropdown for a large
    dataset like this

  • It downgrades gracefully: if the user has disabled JavaScript, they can
    still use the address form - they'll just need to type in the address without
    completion assistance


An application which does exactly this, using JSF as the application framework
(the address stored in a session scope bean, text fields are marked as required, etc)
is now available. You can access an

intro writeup here
. Be sure to click on the link at the bottom of the page to go to the
design details document, which describes
how everything works. And perhaps most importantly, you can get the code - it's
checked into CVS on java.net in the bpcatalog module.


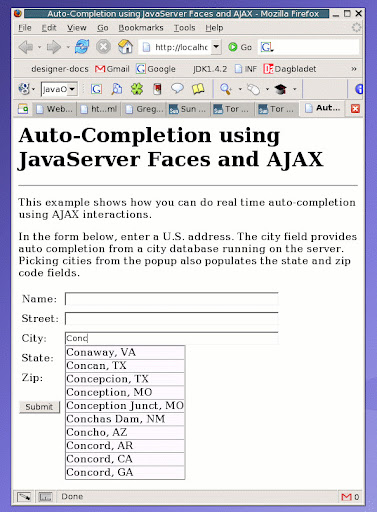
Here's how the form looks in my browser:


browser screenshot


One neat thing about using completion like this in an address form is that on
the server we know not only the city and state you chose for the city field - we
can also look up a zip code for the city too, and when the user clicks on a city
in the completion dialog we automatically populate the given selection into the
city, state and zip fields all at once! Actually obtaining the U.S. zip code dataset
was quite a challenge and would almost be worthy of its own blog entry...
When you adapt this technique for international address forms you'll have fun finding
global data for this. The country list is especially going to be fun for you given
the political nature of the issue - since there are disputes about whether certain
territories are their own country!


Please note that this example is a very simple integration of AJAX and JSF; in
particular, it's not using any custom JSF components or component renderers.
It does however describe a couple of tricks that may be useful to you if you're
trying to AJAXify your own JSF applications.


This was checked into CVS several weeks ago. In the weekends since I've been working
on a custom JSF component which removes a lot of the complexity from the JSF
developer. That's in CVS and works too, but is not fully polished yet. Stay tuned
and I'll blog on that when it's fully cooked.


Thanks to Greg Murray for the helpful advice and obviously for
the original non-JSF autocomplete blueprints entry, since the code is based heavily
on it!


Sunday, May 8, 2005

CSS Cheat Sheet

WARNING: This blog entry was imported from my old blog on blogs.sun.com (which used different blogging software), so formatting and links may not be correct.


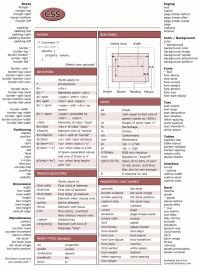
Here's a handy
cheat sheet for CSS, which includes selectors, the box model, and organizes the various
properties into logical categories. Read the full explanation
here. You'll still want a bookmark to
the
spec property index though.


Dave Hyatt, who works on the Safari browser (but used to work on Gecko, the rendering engine
in Mozilla and Firefox) recently posted a fascinating blog entry on
some optimization possibilities in CSS browser implementations.
As part of his long discussion, he mentions that both Gecko and Safari call HTML attributes that
affect CSS "mapped attributes".
I didn't know that -- in my code I've called them non-CSS presentational hints, as in
applyNonCssPresentationalHints(). Yep - super ugly
name but that's what
the CSS spec calls them.
I like "mapped attributes" better so I think I'm going to rename my related methods!


Finally, JSR 273 which I recently mentioned was
discussed on the
ServerSide the last couple of days, but the signal to noise ratio was extremely low. However
the referenced Artima interview with Joe is good.


Saturday, May 7, 2005

Grid Layout or Flow Layout?

WARNING: This blog entry was imported from my old blog on blogs.sun.com (which used different blogging software), so formatting and links may not be correct.


You have probably noticed that when you create a new page or project
in Creator, the page has a grid on it - and when you drag components
on it, they get positioned precisely where you drop them. This is
called "grid layout". Behind the scenes, we use

CSS 2 absolute positioning
to ensure that the component ends up
at the exact same position in your browser.
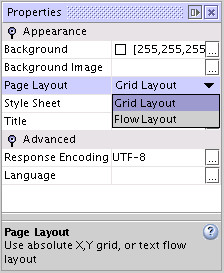


property sheet image

In addition to Grid Layout, you can change your page layout to
something called Flow Layout as well. Why would you use one over the
other?


Grid Layout offers two main advantages:


  • It's easy.

  • It's fast.


If you want to create an input form, you can bang one out in no
time flat - drag components directly to where you want them, and size
them appropriately. Components automatically snap to the designtime grid,
which makes it easier to create a balanced looking page, but you can
do finer adjustments by pressing the shift key while dragging or resizing
to get the pixel coordinates you want.


However, Grid Layout does have some serious disadvantages:


  • Your pages do not resize well. For example, if you want your
    components to stretch when the user resizes the browser, you cannot
    do that with Grid Layout. (This is almost true... we'll get back to
    that)

  • Your pages will not adapt to differing font sizes in different
    browsers, or even user-overrides of font sizes. Many
    browsers offer a "zoom" functionality - I use it myself when I visit
    pages where the fonts are too small to be read comfortably.
    If you have designed a page where you have a label that is positioned
    exactly fourty pixels to the left of a text field, that will not
    work well if the page is zoomed to a much larger size since now
    the textfield will crop the label.

  • You don't get baseline alignment for components you intended to
    be on the same line. For example, you typically want a textfield
    to be aligned with the baseline of its label (such that
    the bottom of the textfield is aligned with the bottom of letters
    like "a" and "x", not letters like "j", "g" and "y".)


So should you just switch to Flow Layout for your page designs?


That's not a slamdunk either. Creating pages with flow layout is a lot
more tedious. You will basically be creating layouts the way pages were
done in the Bad Old Days - using layout tables. The closest thing you
can get to a layout table with the standard JSF components is the
Grid Panel component. The main disadvantage of the Grid Panel
however is that it doesn't offer cell merging with colspan and rowspan,
so you'll need to nest grid panels instead.


The good news is that you can get a lot of mileage with a hybrid approach!
The idea is that you can create the -rough- layout of your page using
grid layout to drop your components - a page fragment as a header,
a page fragment on the left as a navigation menu, and then a grid panel
or two or three in different areas, along with some text label components,
to finish your layout. You then drop your form components inside the
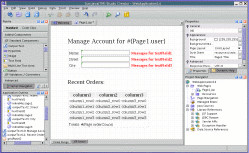


layout components (like grid panel) to finish your page. The reason this
is better, is that inside these layout components, the positioning
is using flow mode. In the screenshot on the right, the label, textfield and error
message in each row inside the grid panel will be laid out in flow
mode inside the grid panel, meaning that if the label takes up more room,
the adjoining textfield (and indeed the whole layout column) will move
to the right to make enough room to fully display it. Try it - in Mozilla/Firefox,
press Ctrl-shift-plus to zoom in on your page. Likewise, notice
how the Data Table below it has been put inside a Grid Panel, along with
the summary label below it. If we didn't do this, and simply placed the
label below the data table using absolute positioning, then when the
application is run, it's possible (and in fact, likely) that more rows will show in the data table,
and the table will run on top of the label. With the label inside
a grid panel, it will move down to always be right below the table.


I mentioned earlier that it isn't possible to have your grid layout
components stretch when the browser is resized. That's not true; you
can use percentages on your width and height settings for the components.
This is tricky however and doesn't work very well. Let's say
you drop a component at (100,100), and set its width to "100%". Now
the width of the component will stretch to the full width of the browser.
The problem is that this does NOT consider the position of the component.
So if the browser window is 800 pixels wide, the component will be
800 pixels wide, but since it's positioned at (100,100), the right
hand side corner will be at (900,100) and you will have a horizontal
scrollbar - not what you intended I'm sure.
The easiest way to "fix" this is to simply make the percentage
less than 100%, say 80% (or gradually less the further your component
is positioned to the right) but it should be clear that this is a hack.
You can counteract some of these effects using negative margins and such
but I don't recommend it.


The main point I wanted to get across in this blog is that even though
the page layout property makes "Grid Layout" or "Flow Layout" an
either/or-decision, the reality is more complex; every component can
be positioned in flow mode or absolute positioning mode. What determines
this is the style property on the component.


Sunday, May 1, 2005

pe-start

WARNING: This blog entry was imported from my old blog on blogs.sun.com (which used different blogging software), so formatting and links may not be correct.


Creator ships with a script under startup/bin named pe-start.sh (there's a .bat file there for Windows too).
You can use this to start the Application Server from the command line.
One of the arguments to this script is -reset:


% ./startup/bin/pe-start.sh -reset
The domain (creator) isn't running.
CLI157 Could not stop the domain creator.
WARNING: The --adminpassword option is insecure and should not be used since it can compromise your password. Please use either the command prompt or the --passwordfile
option.
Using default port 8,686 for JMX_ADMIN.
Domain creator created.
Starting Domain creator, please wait.
Log redirected to /home/tor/SunAppServer8.1/domains/creator/logs/server.log.


One of the nice things about this script is that it not only starts the app server - it completely resets it, by throwing away the entire Creator domain. Every time you deploy a new application it's added into the domain and restarted the next time. This is a feature - you wouldn't want to have to redeploy all your web applications if you needed to restart your system for some reason. But of course these add overhead. If you know you're not using any of the previously deployed web apps, you can just remove them. There are ways to do that through the Admin Console (on port 14848), or even via the Server Navigator, but I like using the script to get a completely fresh start, especially if I'm going to give a demo :-) If only I had used this before....


NetBeans plugins I use, part 1

WARNING: This blog entry was imported from my old blog on blogs.sun.com (which used different blogging software), so formatting and links may not be correct.


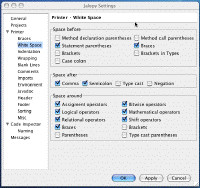
One of the optional plugins for NetBeans I rely on the most heavily, is the Jalopy plugin.
It reformats source files (provided they are compilable). Unlike the built-in basic formatting,
it performs all kinds of nice cleanup, like moving fields to the top of the file, enforces
whitespace around if blocks, and so on. And it's extremely configurable - if you invoke the


Jalopy Settings dialog from the Tools menu, you get the dialog shown on the right - plus a source
file viewer on the right immediately showing the effects of your toggling of components on
the options panel on the left. (Click on the image to see it in full size - that's true in
general for all small pictures in my blog.)


I've gotten in the habit of hitting Ctrl-Shift-F10 after making edits to my files now, to immediately
have the source file reformatted.


Of course, the first time I did this, I generated a huge number of CVS diffs in my module.
People generally don't like that since it makes source code archaeology harder. But finding
the original checkin comment for a reformatted line is still possible, so because of that I find
that the benefits outweigh this disadvantage. In fact, I would be quite happy if the entire NetBeans
source tree was reformatted too, since a couple of people checking in code in that code base
(at least early on) like to put a space between function names and the parentheses -- foo ();
and that drives me nuts!!


By the way, Here's my Jalopy settings XML file
- you can import it directly from
the Jalopy Settings file. This is basically the default JDK style, but I've increased the line
length up to 100 instead of 80 columns, and I've tweaked the import organization. One thing I left
alone was its parenthesis preferences, even though I like to omit some parentheses where it goes
and puts them back in.


You can find the plugin NBM file for 4.0/4.1 here.
Note that there is also a commercial
plugin
version of Jalopy for NetBeans, and it supports JDK 1.5 - which the current free plugin does
not. I just started writing some JDK 1.5 code the other day - and loved every minute of it. The new language
constructs and APIs are extremely handy.


I use some other optional plugins quite a bit too - I'll blog about them another time.