Thursday, January 27, 2005

Rock The Vote

WARNING: This blog entry was imported from my old blog on blogs.sun.com (which used different blogging software), so formatting and links may not be correct.


Tool Of The Year
Creator is nominated as Development Tool of the Year. If you use it and
agree, please consider
casting a vote
for it. The other candidates in that category are
MyGeneration Code Generator/OR Mapper from MyGeneration Software,
Poseidon for UML from Gentleware, Eclipse from the Eclipse Foundation, and
RADvolution Designer 2005 Professional Edition from DevelopGuidance.


Tip: Editor Abbreviations

WARNING: This blog entry was imported from my old blog on blogs.sun.com (which used different blogging software), so formatting and links may not be correct.


You might have used Code Clips already, since they're featured prominently
in the various Creator

tutorials
.


However, the editor has another less visible feature called "abbreviations".
You can define code fragments which are automatically inserted into the
document at the caret position when you type the abbreviation's name
followed by the space character.


One such useful abbreviation is one to insert a try/catch
block. When writing code in your Creator Java files, you're often dealing with
database related calls, which might throw exceptions, so you need to catch them.
You also want to send the exception message to the log file so you can figure out
what went wrong. To do that, you have to add a
try/catch block to your code. Creator has an
abbreviation for that, named "trc" (for try/catch). Just
type in the four keystrokes [t], [r], [c], [space], and your editor
will go from


to (as soon as you hit space):


Voila! Notice that it puts your caret in the right place too (and that
the original abbreviation name, trc, is gone.)


Here are some other abbreviations you can try: fori to add
a for loop, and
sout for System.out.println("").
You can easily add your own abbreviations too, or, change
the existing ones. The following screenshot shows you everything you
need to know:


  • You open the Tools | Options dialog, drill down to
    the Java Editor, and locate the Abbreviations item on the
    right. Click the ... button to open the customizer.

  • This will show a list of your abbreviations which you can edit,
    or study to learn some of the existing ones if you want to use
    them.

  • When you edit an abbreviation you get to write the code fragment
    that will be inserted. Use the vertical bar ( | ) to
    indicate where the caret position should be after the abbreviation
    substitution. For example, the try catch abbreviation looks like
    this:

    try {
    |
    } catch (Exception ex) {
    log("Error Description", ex);
    }


If you come up with some really useful ones, let us know and we'll add
them to the builtin default abbreviations.


Tuesday, January 25, 2005

Designtime API Guide Available

WARNING: This blog entry was imported from my old blog on blogs.sun.com (which used different blogging software), so formatting and links may not be correct.


Joe Nuxoll has published the Creator

Design Time API Guide
for JSF components. This guide tells you how to add design time behavior to your components such that
users of your components can have a rich experience with them in the IDE - you can create interactive
wizards run at component drop, write customizers for the components, allow your components to specify
which components are allowed as children of your container component, etc. etc. I have a special fondness
for these APIs since they are how you can "talk" to the designer :-) (The

API javadocs
have been available online for a while.)


He will also soon be hosting an online chat
on the subject. If you're a JSF component developer you definitely want to both read the article in depth
and check out the chat!


Joe has a blog but it looks like he needs a nudge to start writing...
Take it away, Joe!


Open Solaris

WARNING: This blog entry was imported from my old blog on blogs.sun.com (which used different blogging software), so formatting and links may not be correct.

OpenSolaris


There's some exciting Solaris news today -- the first part of Solaris
has been open sourced (with the rest on the way -
and also, a record
1,600 Sun patents have been released.)


I'm a big Solaris fan - I used SunOS in college, and since then I've been at Sun
for nine years where Solaris has been my primary development platform. The first five years at Sun
I worked on the Solaris development tools, mostly the debugger, so I really got to
get close to the metal. I therefore found
Bryan Cantrill's blog entry
on the just released Solaris DTrace code really
interesting -- I love source code snippets with juicy comments!


Now that I work on Creator, the platform focus is different since we're trying to
address other platforms like Windows, Linux and OSX. Most of my coworkers work
on those platforms, so I'm the primary "Solaris advocate" in our group.
I work at home three days a week (let's not count the number of nights...)
and it's all on Solaris. On my two days going down to the Sun campus I work
on OSX with my Apple laptop. I really like OSX since I can find a terminal, and
treat it like Unix with a pretty GUI. But I sure miss Solaris facilities like
the p-tools (pgrep, pkill, ptree, ...).


Thursday, January 20, 2005

Changing your Creator package names

WARNING: This blog entry was imported from my old blog on blogs.sun.com (which used different blogging software), so formatting and links may not be correct.


In Creator, your project name is used as the java package path,
and as the web application context name.


What if your project has grown and you want to change the name, either
because you don't think webapplication24 is very professional
sounding in your context name (which shows up in the web app URL), or because
you don't like to see myfirstsimpletest as the package name on all your now complex page beans?


Unfortunately, there's no support in the IDE to do this yet. Which means
you have to do it by hand.
It's actually pretty straightforward, and there are no surprises; you just
need to change all references in the project from the old name to the new
name. However, if you make any mistakes, it is difficult to track down
the problem. Pages will refuse to open, etc., because under the covers
the IDE may fail to locate the page bean for a JSP since it uses the
package path to do the mapping, for example. Therefore, be careful,
and I don't take any responsibility for any damage to your files, or
mood, as a result of trying the below steps. Worked for me, your mileage
may vary.


First thing's first: Make a backup of your project. If things go wrong,
you'll want to be able to start over - but starting over with the
rename operation, not starting over creating your project from scratch!


And while I have the red paint out:


Don't open your project in the IDE until you are completely
done! If there are inconsistencies in the project, the IDE will
attempt to "fix" it, and suddenly you end up with multiple
getApplicationBean methods,
the project file referring to both the old and the new package name, etc.


When you create a project, Creator takes your project name and
creates a "package name" out of it. This package name is used
in all the Java beans in your project, it's used as the deployment
context root, etc. The package name is derived by lowercasing
your project name, and removing all non-identifier characters from it, such
as punctuation, whitespace, etc. Therefore, "My Project" becomes
"myproject". I'll use "myproject" as my sample old name in the
following code fragments, and "New Name" as the new Project name
(which means "newname" will be the new package name and context root).


    1. Exit the IDE.


    2. Rename the project directory - from My
      Project
      to New Name.


    3. Now comes the most labor intensive portion of the project transformation:
      you'll need to change the java package name, which will involve updating
      all the java files. You can either use an IDE which supports refactoring
      to do this (Creator doesn't yet, but NetBeans does, as does a number of
      other IDEs). If you use an IDE be careful though to make sure it doesn't
      perform any other changes to your code.


      If you do it by hand, the steps involved are:

      • Rename the java package folder, from
        src/src/myproject to src/src/newname

      • For each Java file, update three things: the package declaration
        (first statement in the file) from package myproject;
        to package newname;, and update the return types
        and casts in the getApplicationBean1 and
        getSessionBean1 methods (4 lines to change). (These
        are not present in all files.)


    4. Next, update src/web/WEB-INF/managed-beans.xml.
      Change the managed-bean-class entries in the
      obvious way:

      <managed-bean-class>myproject.Page1</managed-bean-class>

      into

      <managed-bean-class>newname.Page1</managed-bean-class>


    5. If you have customized web.xml or faces-config.xml
      (this is not common unless you are an expert user) make sure any references
      to the old names in these files are updated.


    6. Delete the following directories:

      • project-data/private/Windows/

      • build/


    7. Update project-data/project.properties:

      app.name=myproject

      into

      app.name=newname


    8. Modify project-data/project.prj. Be careful!!
      Change

      <folder name="myproject">
      <file name="ApplicationBean1.java"/>
      ...

      into

      <folder name="newname">
      <file name="ApplicationBean1.java"/>
      ...


    9. Then change the other references from "My Project" and "myproject"
      to "New Name" and "newname":


      <project name="My Project" type="WebApp">
      ...
      <attr name="displayName" stringvalue="My Project"/>
      ...
      <attr name="defaultPackage" stringvalue="myproject"/>
      ...
      <attr name="contextPath" stringvalue="/myproject"/>


      into


      <project name="New Name" type="WebApp">
      <attr name="displayName" stringvalue="New Name"/>
      <attr name="defaultPackage" stringvalue="newname"/>
      <attr name="contextPath" stringvalue="/newname"/>


If you've done all the above steps, do a final search through
your code to make sure that all references to "My Project"
and "myproject" have indeed been updated. Now try loading your
project. It should both load and correctly deploy.
In my case I had introduced
a typo in one of the source files, so I got the new error list
on project load (which was added in patch 6, so make sure you
have the latest bits).


You may have noticed in the last step that there is a separate entry
in project.prj for the
contextPath. If all you care about is changing the context
path which shows up in the project's URL when deployed, you
MAY be able to just change this entry in the project file and
leave all your code with the old package name. I have not tried that - so
I have no idea if it works. If anyone tries it, let me know and I'll
report your findings.


Sunday, January 16, 2005

Page Import document available

WARNING: This blog entry was imported from my old blog on blogs.sun.com (which used different blogging software), so formatting and links may not be correct.


In some
previous
blog
entries I've shown the designer rendering common web pages from the net.
These are great testcases for me to make sure the XHTML and CSS layout
engine is working correctly, at least for common web constructs.
You may wonder how I got the designer to render html pages. No, I didn't
sit and try to replicate the page by dragging JSF components on the page.
There's a hidden feature in the designer called "Page Import", which as of
Patch 5
is not so hidden.


screenshot of the little green j icon
There's a

new document about the feature here
.
Have you been curious what the little green triangles are? See image on the right -- the little triangular green icons in the top left corners of some components. If so, go read the article!


Note that this is a preview feature, so be careful. I just discovered a
bug the other day: If the html page you're importing has an xmlns
attribute on the <html> tag, Bad StuffTM
happens. Fixed but not in bits that are available yet. For now, remove
the attribute before importing.


There is one really cool aspect of Page Import I've gotta point out though.
Some browsers, like Mozilla and Internet Explorer, can save a "complete"
web page, where they not only save a page but all required images and
stylesheets as well. The problem is that they only save images and other
resources that are referenced in the html page. If the page being saved
has an image (or secondary stylesheet) that is referenced from a
stylesheet or style attribute, the image will not be
imported. The designer page import feature on the other hand does handle
this; it imports all external resources referenced in any reachable
stylesheets as well, and these stylesheets are rewritten to reference
the imported copy.


Thursday, January 13, 2005

Creator: How To Highlight Specific Data Table Rows

WARNING: This blog entry was imported from my old blog on blogs.sun.com (which used different blogging software), so formatting and links may not be correct.


screenshot of data table with highlighted row


This question came up in the forum:

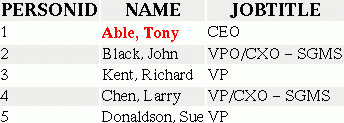
How can you highlight particular rows or cells in a database table
based on business logic? For example, in the screenshot on the right,
I've highlighted the name of any rows where the job title is equal to "CEO".


First, you'll want to use CSS style classes; set up one style class
for normal rows, and another for
rows or cells to be highlighted. Add something like this to your page's
stylesheet (it's in the Resources folder):


.normal {
}

.highlighted {
color: red;
font-weight: bold
}


Next, you'll want to use value binding to tie the styleClass
property for items in the data table to some property which will return the
right style class to use for each cell.


Let's say you drop a Data Table component, and then drop the "PERSON"
table (from the sample "Travel" database bundled with Creator) on that
Data Table. Voila, you get a table populated with PERSONID, NAME, JOBTITLE
and one other row that I deleted by using the Table Layout item in the
context menu.


Next let's create the property we'll bind the styleClass to.
Go to the page bean (by for example double clicking on the page background),
position the caret in between some of the methods, right click and select
Add Property, leave all the defaults (so you're creating a String
property), and name it something like "nameStyle". This will create
a method name getNameStyle() which you now need to implement
such that it returns the String style class name "highlighted" or "normal"
depending on which row is being rendered when the method is called.


The conceptual difficulty in creating a property to return the
right style class
name to use is that a property accessor is a simple getter without
arguments -- you don't have
a "parameter" to tell you which row is being rendered when your method
is called. Here's the trick:


public String getNameStyle() {
Object o = getValue("#{currentRow['JOBTITLE']}");
if ("CEO".equals(o)) {
return "highlighted";
} else {
return "normal";
}
}


There are two things to notice:

  1. You can evaluate expression language statements from your Java
    code by calling getValue()
  2. You can consult #{currentRow to get the database row
    values for the current row being rendered in the table


If you click on the output text components in the data table (not the
ones in the header), you'll see that the above expression,
#{currentRow['JOBTITLE']}, is precisely what the JOBTITLE
column's Output Text component is bound to. Just like the component's
renderer, we can find the data for the current row, and then apply any
logic we want to it - here's it's as simple as checking if it's equal
to "CEO", but you could evaluate multiple different fields, including
ones not shown in the Data Table, and apply various logic to decide which
style class to return. And note that there's nothing requiring you to
limit yourself to two style classes, and you can highlight any number
of rows, not just one.


screenshot of property binding


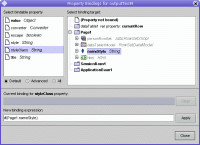
The way you bind the styleClass property to for example the
Name column is to locate the output text in the Name column (not the
one in the header, the second one), right click on it, and choose
Property Bindings. That should give you a dialog like the one
on the right (click to enlarge). On the left, choose the
styleClass property, and on the right, drill into Page1 and
locate your new property, nameStyle. Don't forget to hit
Apply when you're done - it's a little unintuitive.


TIP: The expression language syntax is explained in a help document
that ships with Creator (as of one of the recent patches). Just go
to the Help menu, select Help Contents, click on Search, and type
"Expression"; for me the top topic returned is the one you want - titled
"JavaServer Faces Expression Language".